[Spring][IntelliJ] SpringBoot HotSwap with IntelliJ [2019-02-19 Updated]
https://docs.spring.io/spring-boot/docs/current/reference/html/howto-hotswapping.html
1. build.gradle 파일의 의존관계 설정 (spring-boot-devtools)
compile('org.springframework.boot:spring-boot-devtools')2. 인텔리J 설정(Ctrl + Alt + S)
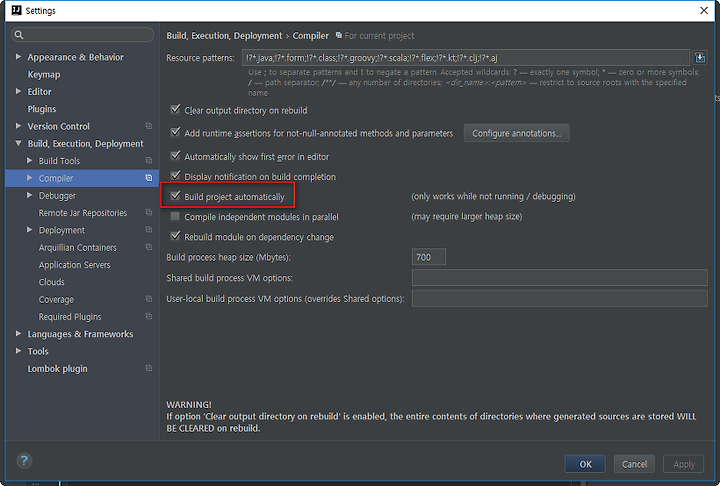
Settings > Build, Execution, Deployment > Compiler 메뉴에서 Build project automatically 체크
3. Registry 값 변경
Ctrl + Alt + Shift + /
를 누르면 나오는 메뉴에서 Registry 를 선택하고 아래와 같이
compiler.automake.allow.when.app.running 레지스트리 값을 true로 변경(체크 하면 됨)

4. 인텔리J 를 재부팅 하고 확인해보기
--- 추가 내용 ---
잘 안 되길래 좀 헤멨다가 다시 정리한 글.
Spring Boot Hot swap using spring-devtools with intelliJ
Description
어플리케이션이 실행 중인 상태에서 클래스 파일이나 정적 자원들을 수정할 경우, 매번 서버를 재시작해주어야 하는 불편함이 있는데, 개발 단계에서는 hot swap 을 적용하여 시간을 아낄 수 있음
Process
IntelliJ 설정
Settings > Build, Execution, Deployment > Compiler 에서 “Build project automatically” 옵션에 체크 후 OK
Ctrl + Shift + Alt + / 를 타입하면 Registry 를 조회/편집할 수 있는 메뉴가 나온다. Registry 를 눌러서 compiler.automake.allow.when.app.running 키 값을 찾아서 체크해준다.
Rerun IntelliJ
Spring Boot 설정
dependencies 추가
compile('org.springframework.boot:spring-boot-devtools')
application.yml (또는 application.properties)에 속성 값 설정
spring.devtools.livereload.enabled=true
spring.devtools.restart.enabled=true
spring.thymeleaf.cache=false
스프링 부트 어플리케이션 실행 방법
gradle bootRun 으로 해도 스프링 부트 어플리케이션은 실행되지만 hot swap은 적용이 안 되었음
따라서 hot swap을 적용시키고 싶으면 main() 메소드를 갖는 main class를 실행해주어야 함. main class를 실행시키면 잘 되는 것을 확인했음.

2019-02-19 추가 내용
Class Hotswap 이 잘 안 된다는 제보를 보고 저도 다시 삽질을 좀 해봤습니다.
아래의 몇줄로 요약하니, 도움이 되기를 바랍니다.
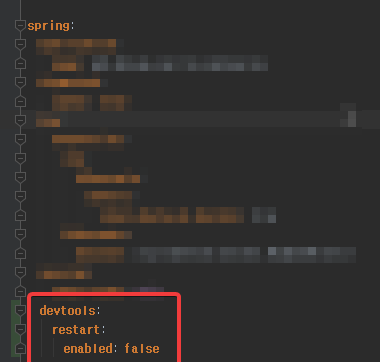
1. spring.devtools.restart.enabled=false 로 설정
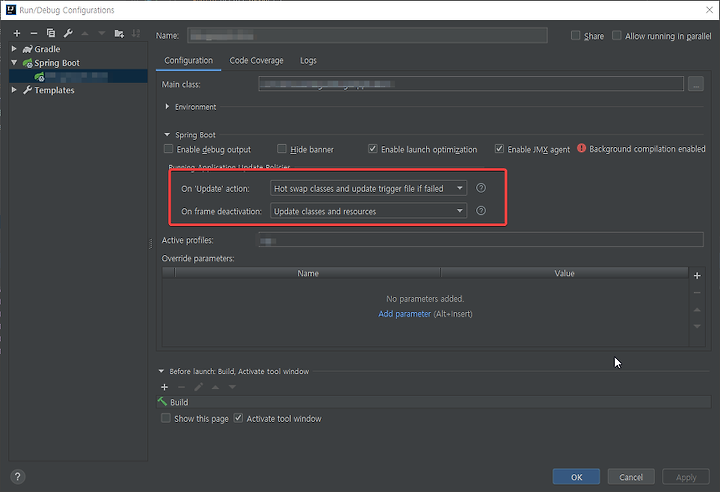
2. IntelliJ Run/Debug Configuration 에서 On 'Update' action : "Hot swap classes and update trigger file if failed" 및 on frame deactivation : "Update classes and resources" 지정

3. 스프링 부트 앱을 디버그 모드로 실행
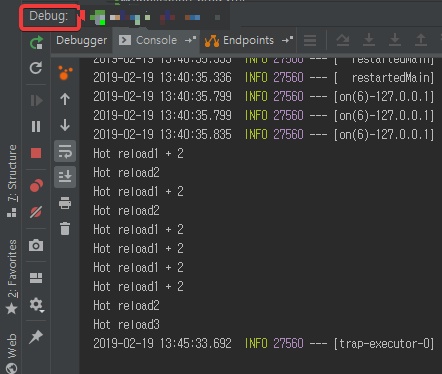
4. 클래스 코드 수정 후, 브라우저(또는 IntelliJ가 아닌 다른 window)를 클릭하면 on frame deactivation 에 지정한 동작이 실행됩니다. 이 때, 클래스가 변경되면 reload 할거냐고 묻는 dialog 가 뜨는데, "다시 묻지 않기"에 체크를 한 후 "Yes"를 선택하시면 그 다음부터 컴파일/빌드/hotswap이 되는 몇초만 기다리면 Container 재기동 없이 변경된 class가 실행됩니다.
이 때, on frame deactivation 이 아니라 on 'Update' action 에 지정한 동작을 발동시키기 위해서는 "Ctrl + F10" 의 키맵이 할당된 "Run" > "Update XXXApplication application" 을 클릭하면 되고, 디버그 모드일 경우에는 "Run" > "Reload changed classes" 메뉴가 활성화 되어 있으므로 이걸 실행시켜도 됩니다.
사실, 아까 On 'Update' action : "Hot swap classes and update trigger file if failed" 의 설정을 하였기 때문에, "Run" > "Update XXXApplication application" 자체가 "Run" > "Reload changed classes" 에 대한 alias 가 되었다고 볼 수 있습니다.